Baileigh Industrial Band-saw
Safety Precautions/Loss Prevention
- Operator must be wearing safety glasses.
- Saw location requires operators to be wearing steel-toed boots and green coat.
- Do not operate saw without prior training.
Blade Maintenance
When operating the band saw with a NEW saw blade, it must undergo a "break-in" period prior to standard use. The directions for breaking in a new saw blade are as follows...
- Set blade speed to recommended settings specific to the material being cut. The break-in period should not affect this factor.
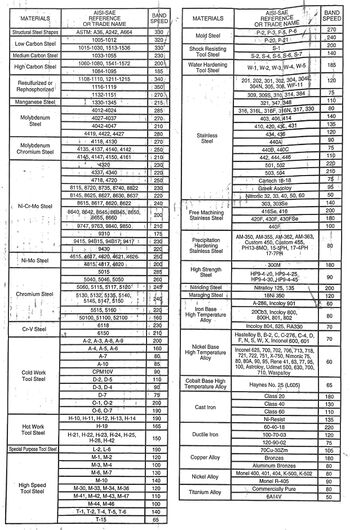
- Use available resources to select proper blade speed (laminated charts attached to saw or table located in this SOP).
- When sawing begins, use only 0% to 33% of the feed pressure (controlled by hydraulic lever).
- Increase feed pressure in intuitive increments as the blade cuts more area.
- The pressure can be returned to normal once the blade has followed the above method to cut a combined area of 50-100 in^2.
- Make sure to communicate with fellow operators where the blade is at in the break-in processes so that it is done correctly.
Example: Operator A is cutting four different 3x3 cuts with a new blade. Their first and second cuts should be made with a feed pressure within the range of 0% to 33% (blade has cut 18 in^2 total so far). The third and fourth cuts can be made at a feed pressure in-between 33% and ~66% (a total surface area of 36 in^sq has now been cut). Operator A leaves a note on the saw that the blade is still being broken in and has cut ~36 in^2 of material.
Operator B needs to make a two 5x5 cuts. For their first cut, they should use a feed pressure of about 66% and increase it slowly throughout the large cut. Following this cut, the blade would have sawed 61 in^2 of material which is within the 50-100 in^2 break-in range. Operator B can now make their second cut at any feed pressure they want because the blade is broken in.
Note: Use hearing and visual cues to make sure that this process is working properly. If at any point you notice poor function or signs of stress on the blade, reduce the blade pressure to allow for a longer break-in period.
Standard Operation Procedure
Sample and Machine Set-Up
- Briefly check machine for unsafe conditions: broken blade, metal scraps, E-STOP button.
- Raise blade of saw and lock it in place using hydraulic descent lever.
- Make any necessary machine adjustments that are needed regarding specimen positioning and cut location. After all changes have been made, check to make sure that saw blade will not come in contact with vise when cutting. This may occur if angle of cut was manipulated.
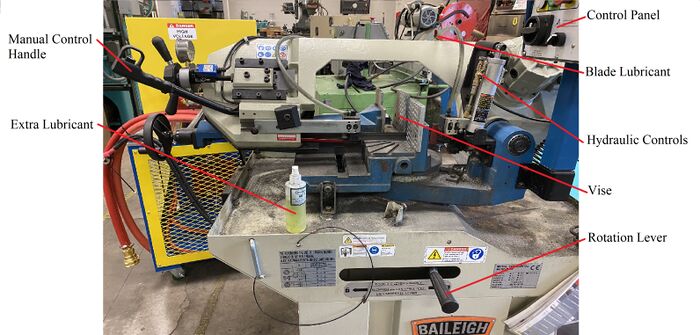
- Cut angle may be changed by using lever (see figure at bottom of page) to unlock blade table. Rotate to desired angle and then lock table using the same lever.
- Blade guides may be changed to better fit size of sample.
- With the blade locked in the up-right position, place sample into vise and tighten. Part should be secured enough that it will not move or slip during sawing.
- Review the blade speed guide attached to control panel of saw. Decide on saw speed based on the characteristics of your specimen. This will be the starting saw blade speed.
Machine Operation - Automatic
- Turn on machine by turning main switch. Make sure E-STOP is pulled out
- To begin sawing, press the green button. The blade should begin moving.
- Turn cutting lubricant valve so that a proper amount of fluid is running on the blade.
- Use small black knob on control panel to adjust blade speed to the speed determined prior to starting saw.
- As sawing begins, you may slightly increase or decrease the speed as needed. Listen for odd sounds coming from blade to know when to adjust.
- With one hand on the manual control handle, use other hand to ease the hydraulic descent lever to a suitable descent speed. Keep hand on manual handle as the blade comes in contact with sample to assist in first cut. Some pressure may need to be applied.
- Wait for saw to complete cut and manage blade lubricant and speed as needed.
- Once the cut has been finished, turn off the blade by pressing the E-STOP button.
- Turn hydraulic lever so that the blade will not descend. Use the manual handle to lift blade to its upper most position. Remove sample from vise and be aware that it may be sharp or warm.
- If you are cutting another sample, tighten next sample into vise and begin sawing processes.
Machine Shutdown
- Turn off main control switch and lower blade.
- Make sure hydraulic descent lever is closed along with any lubricant fluid valves.
- Sweep up metal shavings with hand broom and make sure the area looks better than when you got there!


