Metal Horizontal Bandsaw
Jump to navigation
Jump to search
The following is an SOP on using the Baileigh metal horizontal bandsaw (model BS-260M)
Contacts
- Russ Stein (restein@mtu.edu)
- Dale Dewald (dkdewald@mtu.edu)
- Tom Wood (tdwood@mtu.edu)
Safety
Overall, this is a very safe bandsaw. However, any sharp moving equipment has the potential to create serious injury, so care should be taken when operating the bandsaw.
- Required PPE:
- Safety glasses
- Steel-toed boots
- Green jacket
- Never put your body in the path of the saw while the saw is turned on.
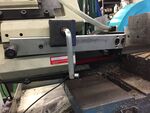
- The saw has a protective cover that can be moved with the provided Allen wrenches (figure 1). After loading the sample but before turning the saw on, loosen this cover and move it as far up the saw as possible without contacting the sample being cut. Then, re-tighten the cover. This minimizes the exposed blade length during cutting.
- Do not use gloves while using this rotating equipment.
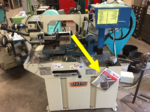
- "Do not cut material harder than 350 Brinell (38 Rc). If you are not certain, go run a hardness test." Hard materials will dull the blade, break teeth off the blade, or snap the blade. A book below the bandsaw (figure 2) describes the proper blade types for cutting different materials. As students, we can not change the blade. Consult Russ, Dale, or Tom with any questions about cutting hard materials.
- Samples must be clearly clamped between the vice grips prior to starting the saw. This prevents the sample from being violently jolted off the table while being cut.
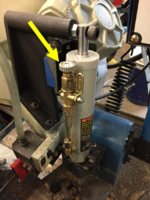
- The pressure applied by the blade during cutting is controlled by a spring in the control panel of the blade (do not touch this spring). The speed at which the blade drops during cutting is controlled by twisting the upper part of an adjustable hydraulic valve (figure 3). If too much pressure is applied while cutting a thin segment, the blade can dull or break. Thus, when cutting thin sections, reduce the speed at which the blade drops. The user can also manually easy the blade into a cut using the handle at the end of the saw (figure 3).
- Sharp metal shards may fly off of the blade during cutting. Thus, keep your body away from the piece being cut. A full-face shield could help prevent this.
- The part may be hot or sharp after cutting. Use caution prior to grabbing a cut piece.
Procedure
- Adjust protective grip to sample size prior to turning on the machine.
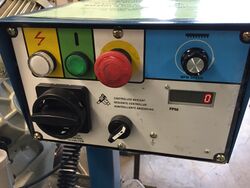
- Twist the large black switch on the lower-left of the control panel (figure 4) 90 degrees to turn the saw on.
- Set the proper cutting speed using the knob on the right of the control panel.
- Load the sample into the grip and position the saw correctly.
- Test the speed at which the saw falls. If needed, adjust the hydraulic cylinder accordingly.
- Using the handle to hold the blade off of the sample, use the green button to turn the saw on.
- Manually ease the saw blade into the cut. Never leave the saw unattended.
- The saw should automatically stop when the cut is complete. In case of emergency, press the red E-Stop to stop the saw.
- Use caution when grabbing cut pieces.
- Turn the saw off using the lower-left switch when complete.


