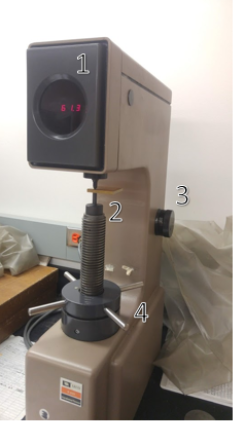
Rockwell Hardness Testing
Jump to navigation
Jump to search
Loss Prevention
- Do not place fingers under indenter
- Do not attempt to move the move the sample during indenting
Setup
- Preparation of the sample should begin by sanding two surfaces smooth down to ~500 grit. No more is necessary.
- Turn on the hardness tester by the switch in the back.
- Find the HRF hardness indenter, the 1/16" steel ball, and insert it into the tip holder. This secures via magnet (2).
- Adjust the mode on the indenter to HRF by turning the knob on the right to 60 kgf (3).
- Find the closest standard to the expected hardness value of your material.
- Load the calibration block onto the anvil. Turn the bottom wheel elevate the anvil until the indenter is near the standard (4).
- Find a position in the indenter that is away from other previous indents by 1.5 diameters
- Continue turning the wheel to elevate the standard until the indenter tip makes contact, slowly continue raising the standard until a firm click or beep is heard. Then stop.
- Allow the indent to take place. The machine will perform this automatically.
- When the indent is complete, as marked by the hardness being displayed on the front (1), lower the anvil and release the sample. If the measure is within the value of the standard you may continue.
- If the measured value is not within the range of the standard do not panic: Return the standard, exit the lab, and contact authorities immediately.
Measurement
- Find your sample and ensure it is of sufficient thickness. No less than 1/8".
- Ensure both sides are parallel and smooth.
- Place the sample on the anvil and raise the the anvil until it is just below the indenter tip.
- Slowly raise the anvil until contact is made and until a firm click or beep is heard from the machine. Release the wheel.
- Once the measure has finished record the value and lower the anvil. Repeat the process as needed.
- Upon completion: Turn off the machine, replace the cover.
