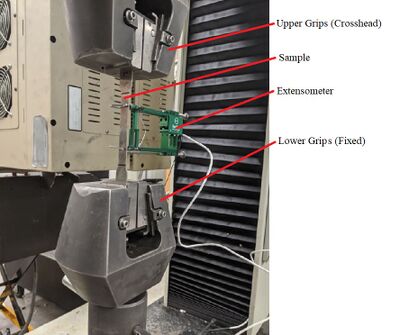
Tensile Testing
Jump to navigation
Jump to search
Loss Prevention
- Safety glasses must be worn at all times due to possible projectile debris
- Be aware that mechanisms on the Instron 4206 move and may crush hands/objects.
- Locate the E-STOP button and be use as necessary to immediately stop testing if it becomes hazardous.
Calibration
Load Cell
- The load cell is checked annually against a reference load cell that is calibrated to NIST and AL2A standards.
- The calibration standard used to check the load component for the machine is ASTM E4.
- The load cell must be less than 1% deviation and repeatability across the range of the load cell.
Extensometer
- The extensometer is checked frequently using a dial micrometer
- The calibration standard for extensometers is ASTM E83
- There is no record of calibration numbers but less than 1% deviation is preferred
Standard Operating Prodedures
Machine and Software Set-Up
- Turn on Instron 4206 and launch the accompanying Test Works software with the proper test template for tensile testing.
- Check that the proper load cell and extensometer (if being used) are registered. Go to “Configure Device” to see registered devices. If incorrect, select the devices from the drop down list and click the “calibrate” button.
Sample Set-Up
- Measure and record sample length, width, and thickness in inches using calipers. Use a marker to define the area measured as length.
- For Instron 4206 and sample set up :
- Place the sample into lower grips so that it is vertical. Grips should only contact the larger, rectangular areas located at both ends of the sample.
- Use handset or Test Works controls to move crosshead to align with the upper section of the sample. Tighten upper grips ensuring that the sample is untwisted and secured.
- If you get a handset error message, the handset controller is active and the equipment will not operate b the software. You have to disable the handset by pushing the top right button with the lock on it.
- Attach the extensometer if you are using one on to the tested length of the sample. Remove the pin prior to testing.
Running Test
- Zero all channels on the Test Works software by right clicking bottom of screen.
- Press the green arrow key on Test Works to begin the test. The software will prompt for sample labels and geometry prior to loading.
- Monitor sample during test for slippage from either the upper or lower grips.
- Test Works will notify users when the test is complete. Remove the sample carefully.
- The TestWorks software will prompt the user to return the crosshead to return to its initial position.
- Do not auto return the cross head until the sample has been removed from the grips. Failure to do so will result in the sample being crushed and possible equipment damage.
- Save necessary figures, test files, and raw data files for proper analysis.
- If you wish to export your data to Excel. Click the specimen you wish to export and click File/Export/Preview/Specimen. This will open a text file and save the text file in a separate location and open in excel.
