Tinker-Omega Sand Mixer
Jump to navigation
Jump to search
Safety Precautions/Loss Prevention
- Wear nitrile gloves to prevent skin irritation due to resin and catalyst.
- The sand mixer is in the foundry so safety glasses and green coat must be worn at all times.
- No food or beverage is allowed in this location.
- “Emergency Stop” button available on the machine can be used to immediately stop the mixer’s motor in case of imminent danger of injury or damage.
- Note: The “Stop” option of the machine’s operating joystick can be used to stop mixing within 6 seconds. This should be used in non-emergent situations.
Standard Operation Procedure
Machine Preparation
- Verify that the sand hopper is full.
- Turn on main power. The “POWER ON” button may also be turned on once the controller has booted up.
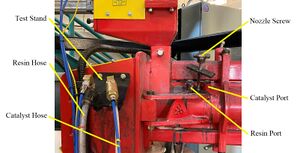
- Remove resin and catalyst hoses from test stand. Check both nozzles and ports for sand or other residue that must be removed prior to operation.
- Perform similar inspection of the sand discharge port and clean build-up as necessary.
- By using the “MANUAL” controls on Allen-Bradley software, run a small amount of resin through resin hose into the designated waste container to establish flow (Resin OFF -> ON). Once complete and hose is off, place hose into its designated port.
- Repeat previous step with catalyst hose. Secure hoses with screw system located by ports once complete.
Machine Operation
- Navigate to the “AUTO RUN” screen prior to the mixing of any sand.
- On the controls on the mixer’s head, set the knob settings to A1 or A2 for continuous run.
- Use the joystick on the same controls to run sand mixture into waste bin for about 3-5 seconds to prime mixer.
- The knob settings should now be changed to setting that is specific for the mold type being made (labelled on side of mixer controls). This will dispense the amount of sand necessary to fill the mold dimensions.
- Move prepared mold onto vibration table in front of mixer.
- Keeping the machine head over the sand waste barrel, use joystick to begin filling processes. Move machine head over mold after it has ran for 3 seconds over waste barrel.
- While/After sand has been dispensed, use provided tools to uniformly pack the sand mixture into the mold.
- Allow 10-15 minutes for mixture to cure. After it may be removed from mold for casting.
- For every 2-3 molds made, the sand discharge port must be cleaned. Turn on the “E-STOP” button while doing so. Use available tools (metal bar, threaded rod, saw, etc.) to breakup sand build up as much as possible.
Machine Shutdown
- With “E-Stop” on, clean the discharge port of the sand mixer.
- Pull “E-Stop” button back out and enable system by pushing the green “POWER ON” button.
- Select “Gate A” in manual screen to purge mixer into waste barrel. Let the mixer run for about 5 seconds before unselecting the button to turn it off.
Nozzle & Port Maintenance
- Obtain a small container of water (is typically a coffee container). Remove the resin hose from its port and submerge nozzle in water.
- Repeat first step with kerosene and the catalyst hose. The container of kerosene can be found in the flammables cabinet of the deformation lab (usually is in labelled paint can).
- While nozzles are soaking, use the black brush located in the “Cleaning Tools” can to scrub the resin port with water from container. Rinse brush several times throughout process.
- Repeat previous step with soft tan brush and kerosene for catalyst port.
- Use respective brushes to clean the nozzle openings for both the resin and catalyst components. Resin nozzle/hose may need several second to drain prior to this step.
- Return nozzles to test stand once cleaned properly.

