WAAM Mg Metallography
Jump to navigation
Jump to search
Loss Prevention
- Safety glasses should always be worn in the metallography labs.
- Gloves should always be worn when working with chemicals such as etchants and alcohols.
- Wear a respirator when working with powders.
- Loose clothing should not be worn because it can get caught in the rotating table potentially causing injury.
Mounting Procedure
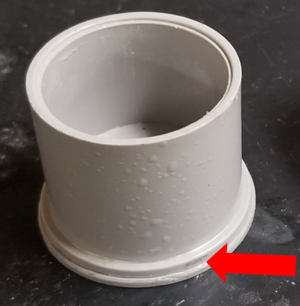
- Ensure that the bottom cover is secured and that the flange on the cylinder is on bottom which allows for easier removal of the mounting cup after the epoxy has set (figure 1)
- Cut samples into sections small enough to fit in the mounting cup without touching the edges (figure 1).
- Once cut, place sample in the mounting cup with the surface under examination face down..
- Mix epoxy resin and hardener, ensuring they are of the same epoxy, in a disposable plastic cup with a wooden tongue depressor and follow instructions on the hardener for mixing ratios.
- Pour epoxy mixture into mounting cup ensuring that sample does not move during pouring and that the sample is completely covered.
- Let the samples sit for the epoxy to harden for the time indicated on the instructions on the epoxy.
Grinding & Polishing Procedure
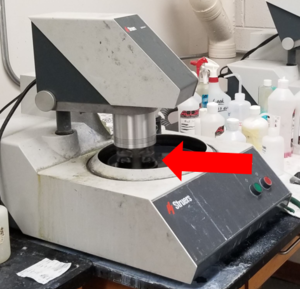
- Secure 320 grit silicon carbide paper in the auto-polisher and place samples in the sample slots (pointed out in figure 2).
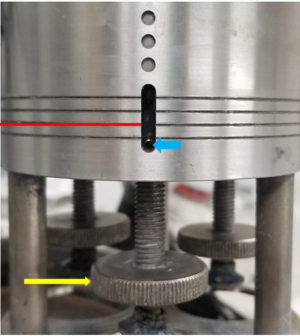
- Apply a load of 20N to each sample by twisting the adjustment wheel such that the bolt (blue arrow in figure 3) inside of the slot above the sample is in line with the second line (red line in figure 3) from the bottom. The load can be adjusted by turning the wheel (yellow arrow in figure 3) above the sample clockwise or counterclockwise to increase or decrease the load, respectively.
- Run polisher with water constantly rinsing the pad until their is a planar surface of the sample.
- Lift auto-polisher head and ensure that they are secured before removing samples.
- Remove samples and rinse with water.
- Repeat steps 1-6 with 400, 600, 800, and 1200 grinding paper.
- After grinding with 1200 grit paper, rinse samples with water.
- Once rinsed with water, spray with ethanol over the sink, and then place samples in a beaker of ethanol ensuring the sample surfaces are not touched.
- Place the beaker with samples into the sonocator and run for about 3-5 minutes.
- To prep the auto-polisher for polishing, run the auto-polisher for ~30 seconds with water running but no paper on the stand and then thoroughly dry the sample holder and stand.
- Place the 6um polishing pad on the stand, ensuring it does not get water on it, and then secure samples with a load of 20N following step 2 again.
- Spray RedLube or GreenLube on the pad to lubricate and then polish for about 3 minutes.
- Repeat steps 7-8 and 11-12 with the 3um and 1um polishing pads.
- After 1um polsihing, 0.05 alumina polishing will be done.
- Place a nonwoven cloth polishing pad on the auto-polisher for 0.05um alumina suspension polishing.
- Clean the samples following steps 7-8 and replace in the auto-polisher.
- Run the auto-polisher for 90secs while spraying the alumina suspension onto the pad when squeaking is heard.
- Clean the samples following steps 7-8 after polishing with 0.05um suspension.
Etching
- In the fume hood, set up a watch glass with nital etchant in it, a beaker of water, and ethanol spray.
- Place sample surface for about 3 seconds in the nital solution and then immediately dunk into the beaker of water making sure not the hit the surface of the sample.
- Spray the sample with ethanol and airdry until sample and epoxy are completely dry.
Metallography
- Open the ScopeTek software on the computer which allows pictures to be taken by the microscope.


